|
| |
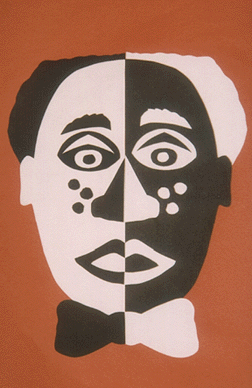
Positive and Negative Face
Materials Needed:
 |
Pencil
|
9"x12" Black Paper
|
9"x12" White Paper
|
12"x18" Color Paper
|
Scissors
|
Glue
|
| | | | |
Directions:
- During the entire project, make sure students always keep the white and
black paper stacked one on top of the other.
- It is easier for the students if they draw on the white paper.
- With the two pieces of paper stacked together have the students draw a
half circle along one side of the paper and cut it out.
- They should now have a black half circle and a white half circle, which
they should glue next to each other in the center of the color piece of
construction paper.
- The remaining black and white paper is to be used for making the eyes,
nose, mouth, etc.
- When drawing the facial features, remember that whatever there is only one
of, such as your nose, you only draw half of. Whatever there is two of you
draw only one of.
- Those facial items that are black, will be glued onto the white half of
the face, and those facial items that are white will be glued onto the black
half of the face.
| |
|